Tuesday, November 15, 2016

Crochet Treats: Amigurumi Donuts

Hello and welcome to Wonder Wishes!


It's been a while since I last posted but at least I'm back. I find it hard to update these things regularly…

Last week was my mom's birthday so I was looking for some amigurumi ideas for a birthday gift. I wanted to crochet some sort of sweet dessert and ended up at Amigurumi Food's donut post

I didn't want the donut to be too big so I modified the number of stitches with my donut. 


I also used some beads as sprinkles instead and added a key ring and charms to make a keychain. 


It'd be so cute to hang on a bag! I wasn't very satisfied with where the colour change happened so I decided to crochet another one that would have more frosting on top. 


I used smaller beads for the sprinkles because it seemed like the sprinkles on the pink donut were too big. Any opinions on which one looks better? Anyways my mom liked this one better so I gave it to her instead of the pink one. 


It has big eyes and a pink nose! 

I became a bit addicted to making donuts…


A last photo: 


If you can't eat too many sweets like me then these will be perfect for you :P 


Wednesday, October 26, 2016

Next Scarf Project with the Caron Cakes

My first project with the Caron Cakes yarn was the Happy Go Lucky Shawlettes and those created colour changes in diagonal strips. To try something different I decided to follow the free pattern on the Caron Cakes label for the Crochet Kerchief Scarf. This one creates more distinct colour blocks. 

Perhaps it's because I'm new to crocheting scarves, but I had a lot of difficulties following the pattern on the label. Definitely not for beginners! 

The free pattern can also be found on Michaels' website. The Crochet Crowd has a very helpful video demonstration here. The video explains the pattern pretty clearly. Without it I wouldn't have even known how to start the scarf. 

I used the Cherry Chip colour for this scarf. Mostly pinks, very warm tones. 


The first half of the scarf was done easily, however, when it was time to close the triangle-shaped scarf back into a point things weren't working out as nicely. 

I ended up taking apart the second half of the scarf two times when I realized I was running out of yarn. 


Third time's the charm it seems. Probably I was not decreasing the stitches every row. Apparently when you're decreasing, one of the turning chains do not count as a stitch like it did when you were increasing. Confusing… 

Nonetheless I am happy with this scarf. I think I like it better than the one I made before. 


The pattern has a nice texture, plus it doesn't feel bulky. 


I love the tassels at the ends!

Tuesday, October 18, 2016

Crocheting Scarves with Caron Cakes


When I went to Michaels, Caron Cakes yarn were on sale and I ended up getting a bunch of them. I searched for some patterns online and found Fiber Flux's Happy Go Lucky Shawlette. It is a free pattern that uses the Caron Cakes so I decided to try it out first using the Blueberry Cheesecake yarn.


Since I had a bit of extra yarn, I made a tassel and bow for the ends of the scarf. The bow was made using the same pattern from my previous post but much smaller. 


I'm happy with how it turned out. It's also the first scarf I crocheted for myself so there's a nice sense of satisfaction. Apparently my mom and sister liked it a lot too, which meant I had to make two more of the same thing. 


It's quite fun though, seeing the colour changes and how they look in this particular pattern. 


This colour of the Caron Cakes is called Bumbleberry. The one below is called Lemon Lime. I really love the names of these! 


I still have some Caron Cakes left so check back later to see what I'll make out of those! 


Tuesday, October 11, 2016

Crochet Bows

Today I have a short post about some bows I made using Lululoves' Chunky Bobble Bows tutorial. I love bows so I made two as a side project to test out the tutorial. I really like how they turned out. If I'm in the mood I'll probably make more in different colours because they can be such stylish hair accessories.


There's a red one and a cream-coloured one. On each I added some charms. It wouldn't be me if I didn't add extra embellishments ;p


I used a smaller hook for the cream-coloured one which is why it ended up smaller than the red.


The bows kind of curl in on themselves as well. This is quite useful if they're used as hair ornaments because the bows would follow the curve of the head, creating a soft, sophisticated feel. 


Saturday, October 8, 2016

Suede Bracelet Making


While doing the fishtail bracelets (here and here) I got a request for a custom-made bracelet. I thought I would go for a sturdier material so I chose to use leather. I haven't made suede bracelets before and wasn't sure how to braid it. Experiment experiment. I looked at a photo I found on Pinterest for reference and created the bracelet below.


I wore this out a couple of times already. I love it! I especially love the dangling charms. 


This charm says "live your dream." An inspirational saying. 


After trying my hand at this method of bracelet-making, I got started on the order I received. -Something pink and full of sparkly charms- 

I had intended for this bracelet to wrap around the wrist three times, but it seems like braiding the suede strips shortens the original length quite a bit. In the end I had a braid that wrapped around twice. 


That's it for now. I think I'm done with the bracelets for a while. Check back later for something new!


Friday, October 7, 2016

More Fishtail Bracelets

Hello! Previously I said that I would experiment more with the fishtail friendship bracelets and post them here. I didn't have a clear idea where these were going but I'm pretty happy about how they turned out.


Since it's October, I made an autumn-themed one. The outcome is pretty different from the blue one I made following the tutorial. Learn the skill and then use it as inspiration to create something new? I hope this will inspire others too :] 


 I made this one a little too big for my wrist so it gave me the idea to wear it as an anklet.


The colours plus the bare feet give a nice earthy vibe?


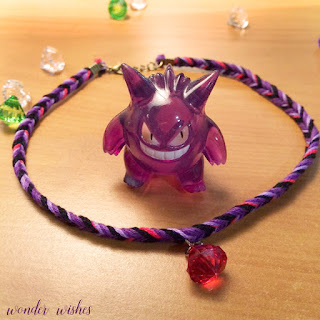
This one is a Gengar-inspired choker. I have a Gengar sitting on my desk so I thought I would make a choker based on it.


Here's a closer view of the choker.

Friday, September 30, 2016

Fishtail Friendship Bracelet Making

Welcome to…


Today I am sharing with you the fishtail friendship bracelet I made using Feltasaurus' DIY Ombre Bracelet Tutorial. Link is provided for your reference.

I really liked the oceanic colours used in the tutorial but I didn't have the same colours. Instead I chose some colours that were similar. 


I don't think it gives off the same oceanic feel. Oh well! I will try again after my next visit to the craft store~ For now I will try some different colour themes, which I will post later. 

Like instructed in the tutorial, I used six different coloured embroidery threads. I wanted a longer bracelet that would loop around twice so I cut an extra 50cm of each colour, totalling to 100cm of each colour to work with. 


Here is how the bracelet turned out, complete with a star charm and blue bell. 


I think it turned out rather pretty. I wonder what colours I should try next? 


Tuesday, September 20, 2016

My Melody and Kuromi Amigurumi

Hello Kitty Crochet by Mei Li Lee https://amigurumei.com

It's been a while since I got this book, but I finally decided to try out some of the patterns when I got all the materials I needed, specifically the safety noses and eyes. The book uses embroidery for the eyes and noses. I suck at embroidering so… with these I just stick them in and done! There are 24 patterns in this book but in the end I chose to do My Melody and Kuromi. I love the juxtaposition of opposites, and coincidence or not these two were exactly that.

Lee describes in the book that My Melody is good-natured and honest. The description on Kuromi said that she liked to cause trouble. Together they were like the angel versus devil. So adorable!


Here is what the works in progress looked like. Overall I found the patterns in the book pretty easy to follow. It was just My Melody's flower that took me a couple of redoes before it looked acceptable. There weren't any guidelines on where to attach each piece as well so I had to figure it out myself.

After attaching the pieces together, I took it a step further and added on some rhinestones. These two are now the introductory pieces to Wonder Wishes' Glamour series!


Extra fancy + extra sparkly Kuromi and My Melody amigurumi made by Wonder Wishes~